01. Preserve
카메라, 원근, 건물 매스, 창호 위치, 기둥 개수, 동선은 계속 고정합니다.
AI Architectural Visualization
SketchUp 뷰 캡처를 기준으로 카메라와 건축 형태는 유지하고, 재질, 실내, 가구, 인물, 날씨, 조경을 단계적으로 더하는 이미지 투 이미지 작업 흐름입니다.
Use the previous image as the reference image for each next step. If your AI tool supports masking, mask only the area you want to change.
Prepared for Instagram comment PDF delivery. Edit brand name, handle, and tool settings as needed.
Process Map
좋은 결과의 핵심은 매 단계마다 하나의 목적만 주는 것입니다. 형태 보존, 재질 변환, 실내 연출, 생활감, 빛, 조경을 분리하면 결과가 훨씬 안정적입니다.
Workflow Rule
AI 렌더링은 한 번에 많이 바꾸는 것보다, 유지할 부분과 추가할 레이어를 분리할수록 건축 형태가 안정적으로 남습니다.
카메라, 원근, 건물 매스, 창호 위치, 기둥 개수, 동선은 계속 고정합니다.
한 프롬프트에서 한 종류의 변화만 요청합니다. 결과가 흔들리면 강도를 낮춥니다.
색감, 날씨, 그림자, 물 반사, 콘크리트 디테일은 후반부에서 정리합니다.
Prompt Formula
건축 시각화에서는 “무엇을 바꿀지”보다 “무엇을 유지할지”를 먼저 쓰는 편이 안정적입니다.
Use this image as the reference. Keep the exact camera angle, perspective, composition, building geometry, facade openings, columns, roof lines, water, deck, and scale unchanged.
Transform only the requested layer: material, interior, furniture, people, weather, or landscape. Do not redesign the architecture.
Photorealistic architectural visualization, natural lens, realistic PBR materials, accurate shadows, physically plausible reflections, editorial architecture photography.
No extra floors, no changed windows, no warped structure, no fantasy shapes, no text, no logos, no over-saturated colors, no distorted people, no cartoon style.
Instagram 캐러셀 기준 4:5 세로 비율을 유지합니다. PDF용 이미지는 같은 비율로 배치하면 전후 비교가 가장 깔끔합니다.
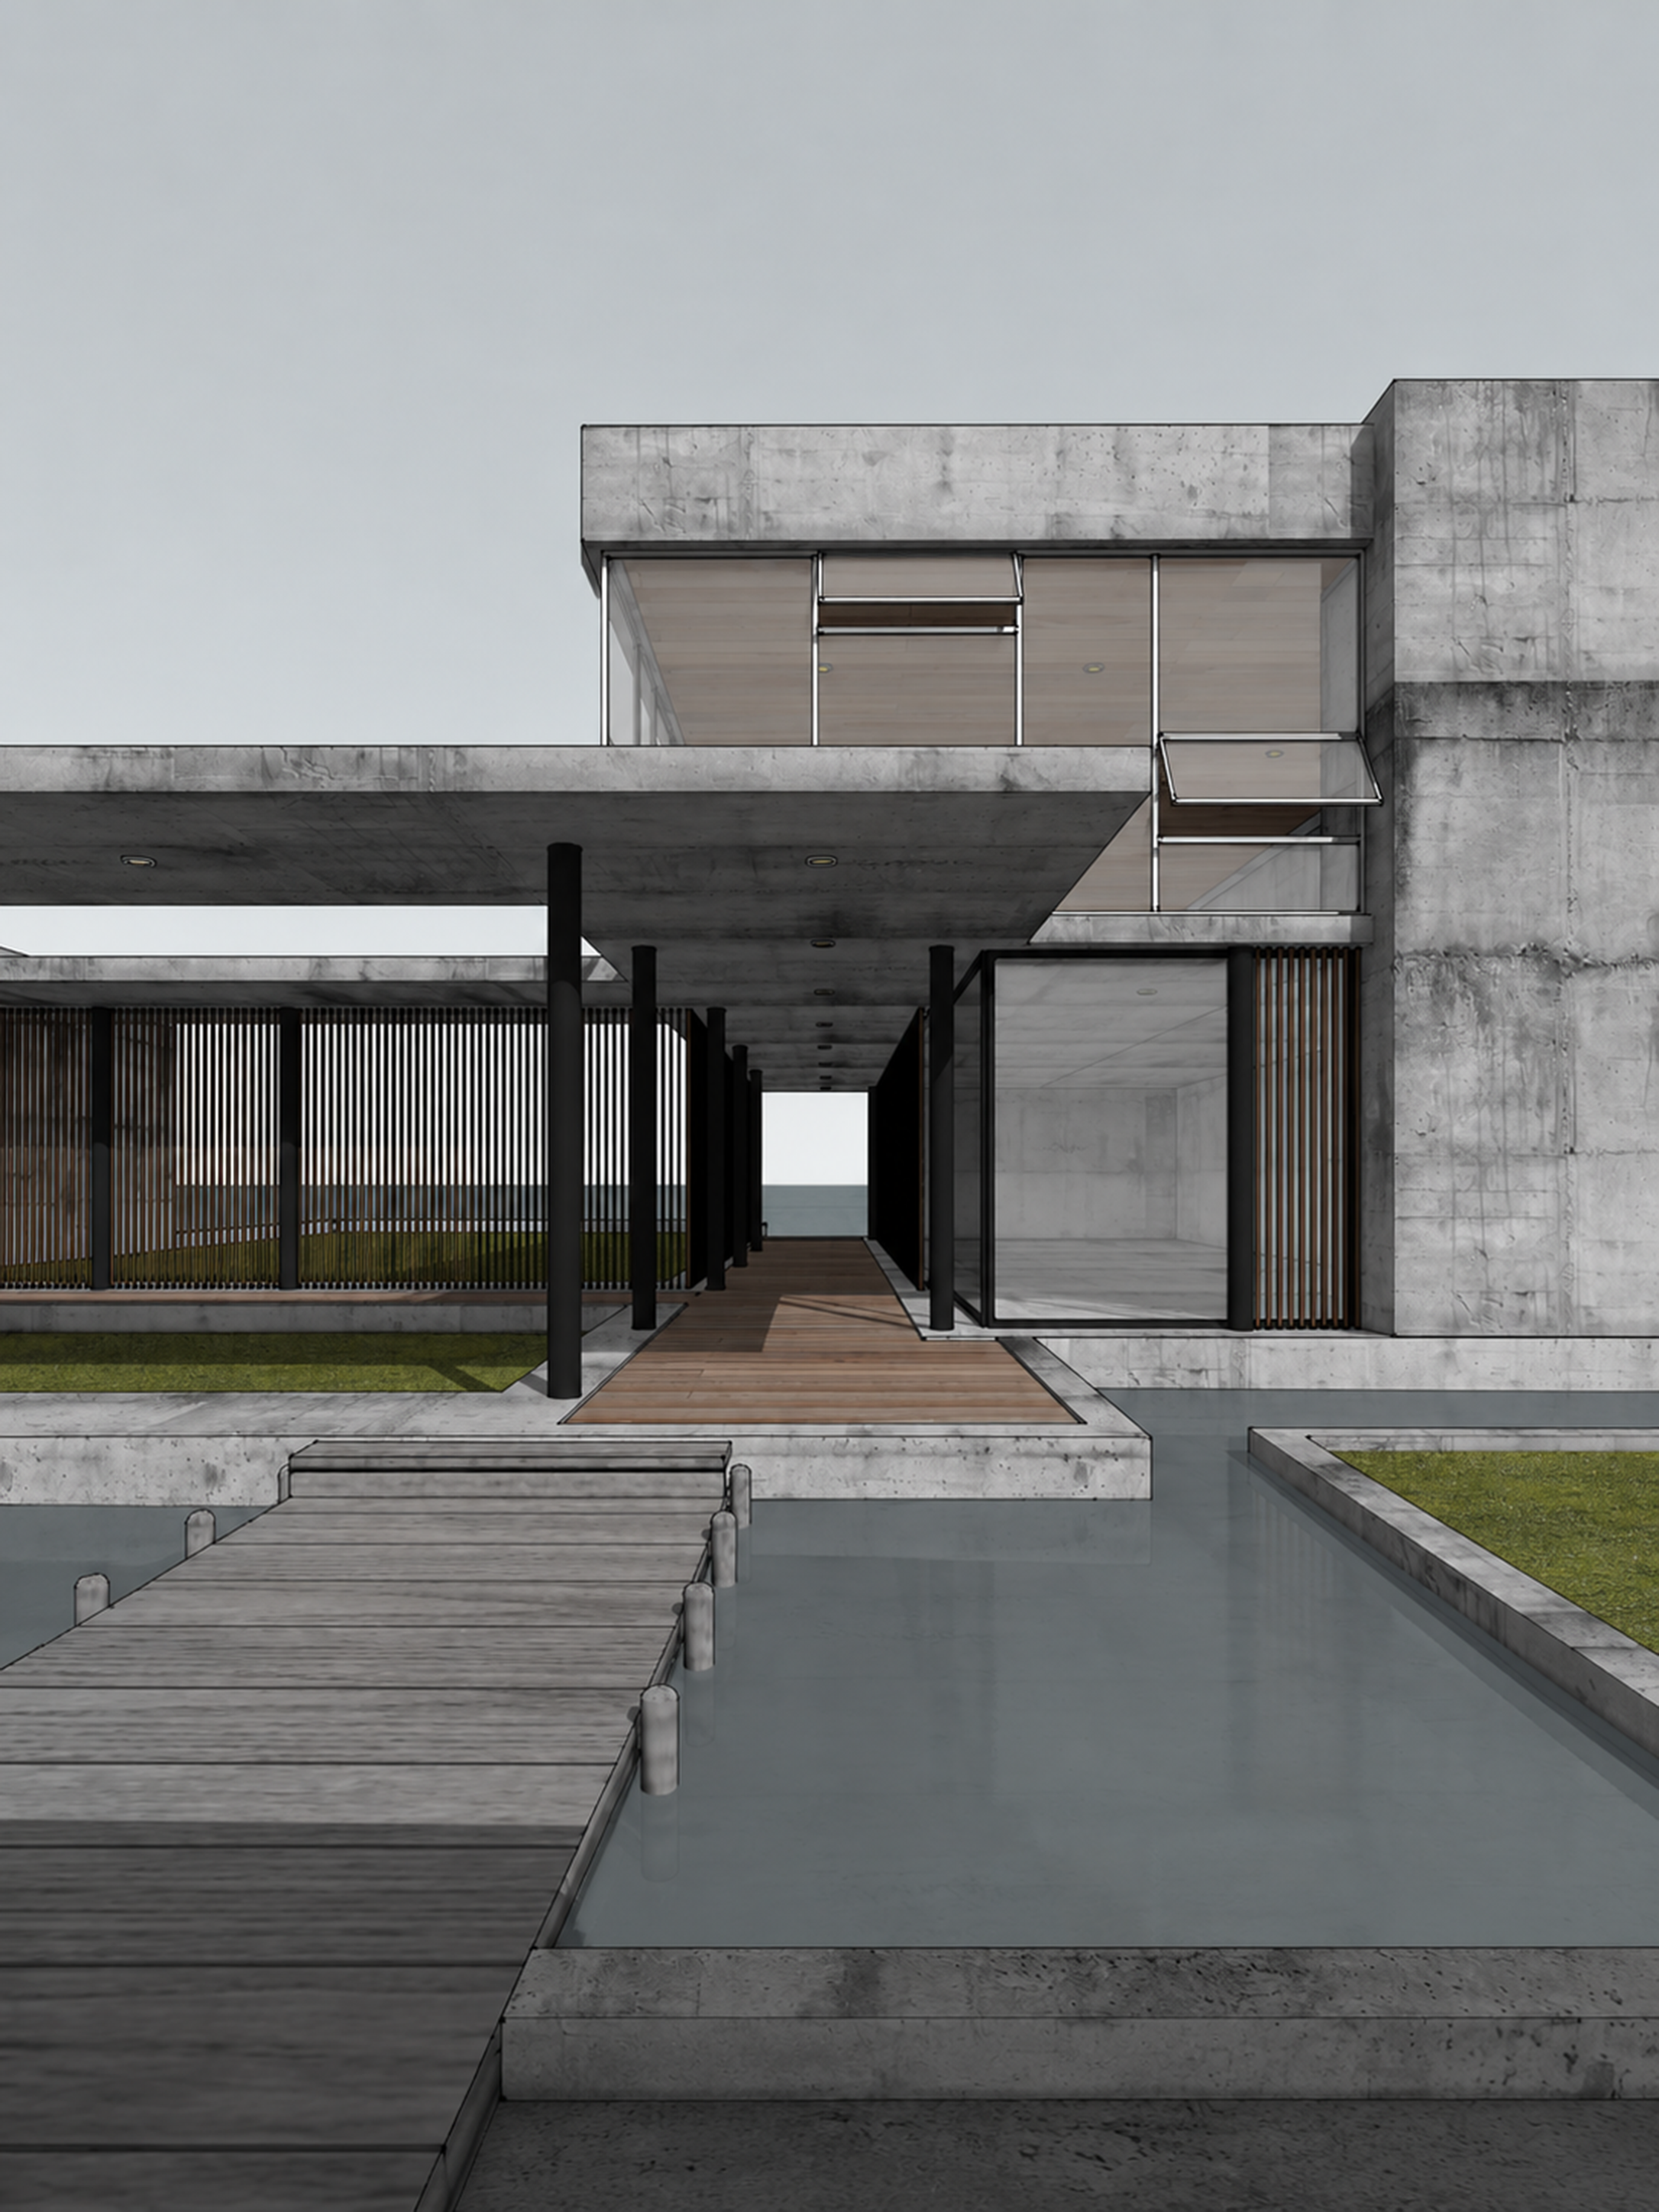
Step 00
AI가 바꿀 기준 이미지를 만드는 단계입니다. 이때 카메라와 구도를 잘 잡아두면 이후 단계의 품질이 크게 올라갑니다.
Set a clean architectural camera view before sending the image to AI.

- Use a vertical 4:5 composition.
- Keep vertical lines straight with a two-point perspective.
- Use a natural architectural lens feel, around 35-45mm.
- Leave enough sky and foreground for later weather, landscape, and reflection edits.
- Export at high resolution.
- Keep the building model, openings, columns, decks, water, and site boundaries clearly readable.
처음부터 너무 낮은 해상도로 작업하면 식재, 사람, 재질 디테일이 뭉개집니다. 가능한 큰 이미지로 시작하세요.
AI 단계 전에는 과한 대비, 강한 색 보정, 복잡한 배경을 넣지 않는 것이 좋습니다.
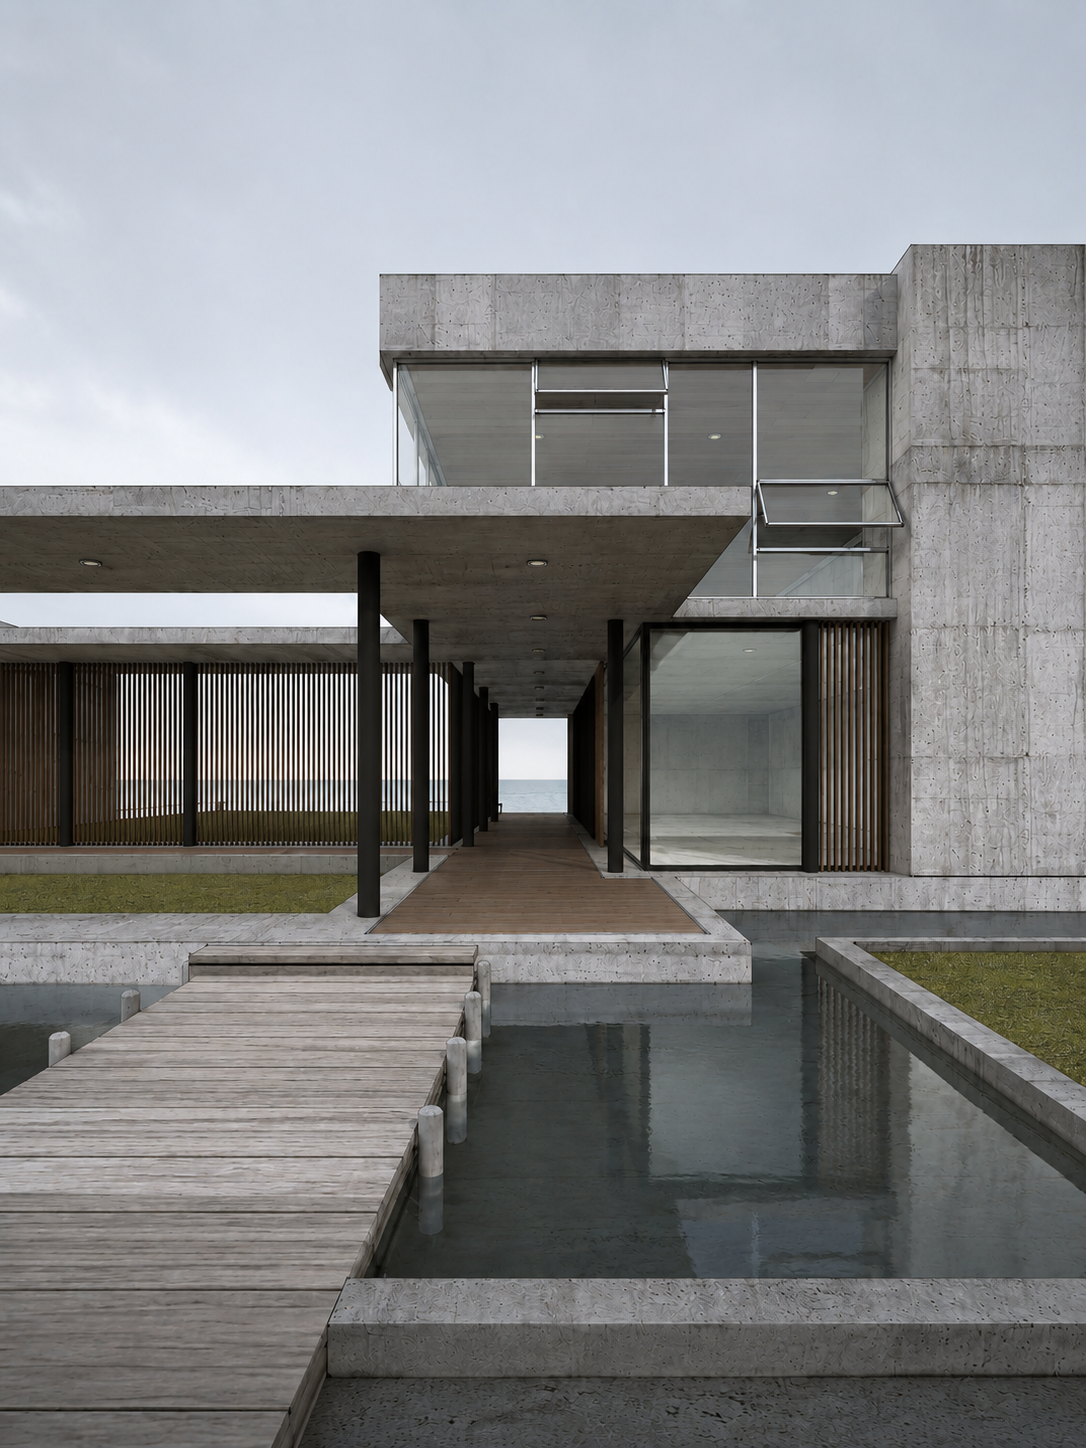
Step 01
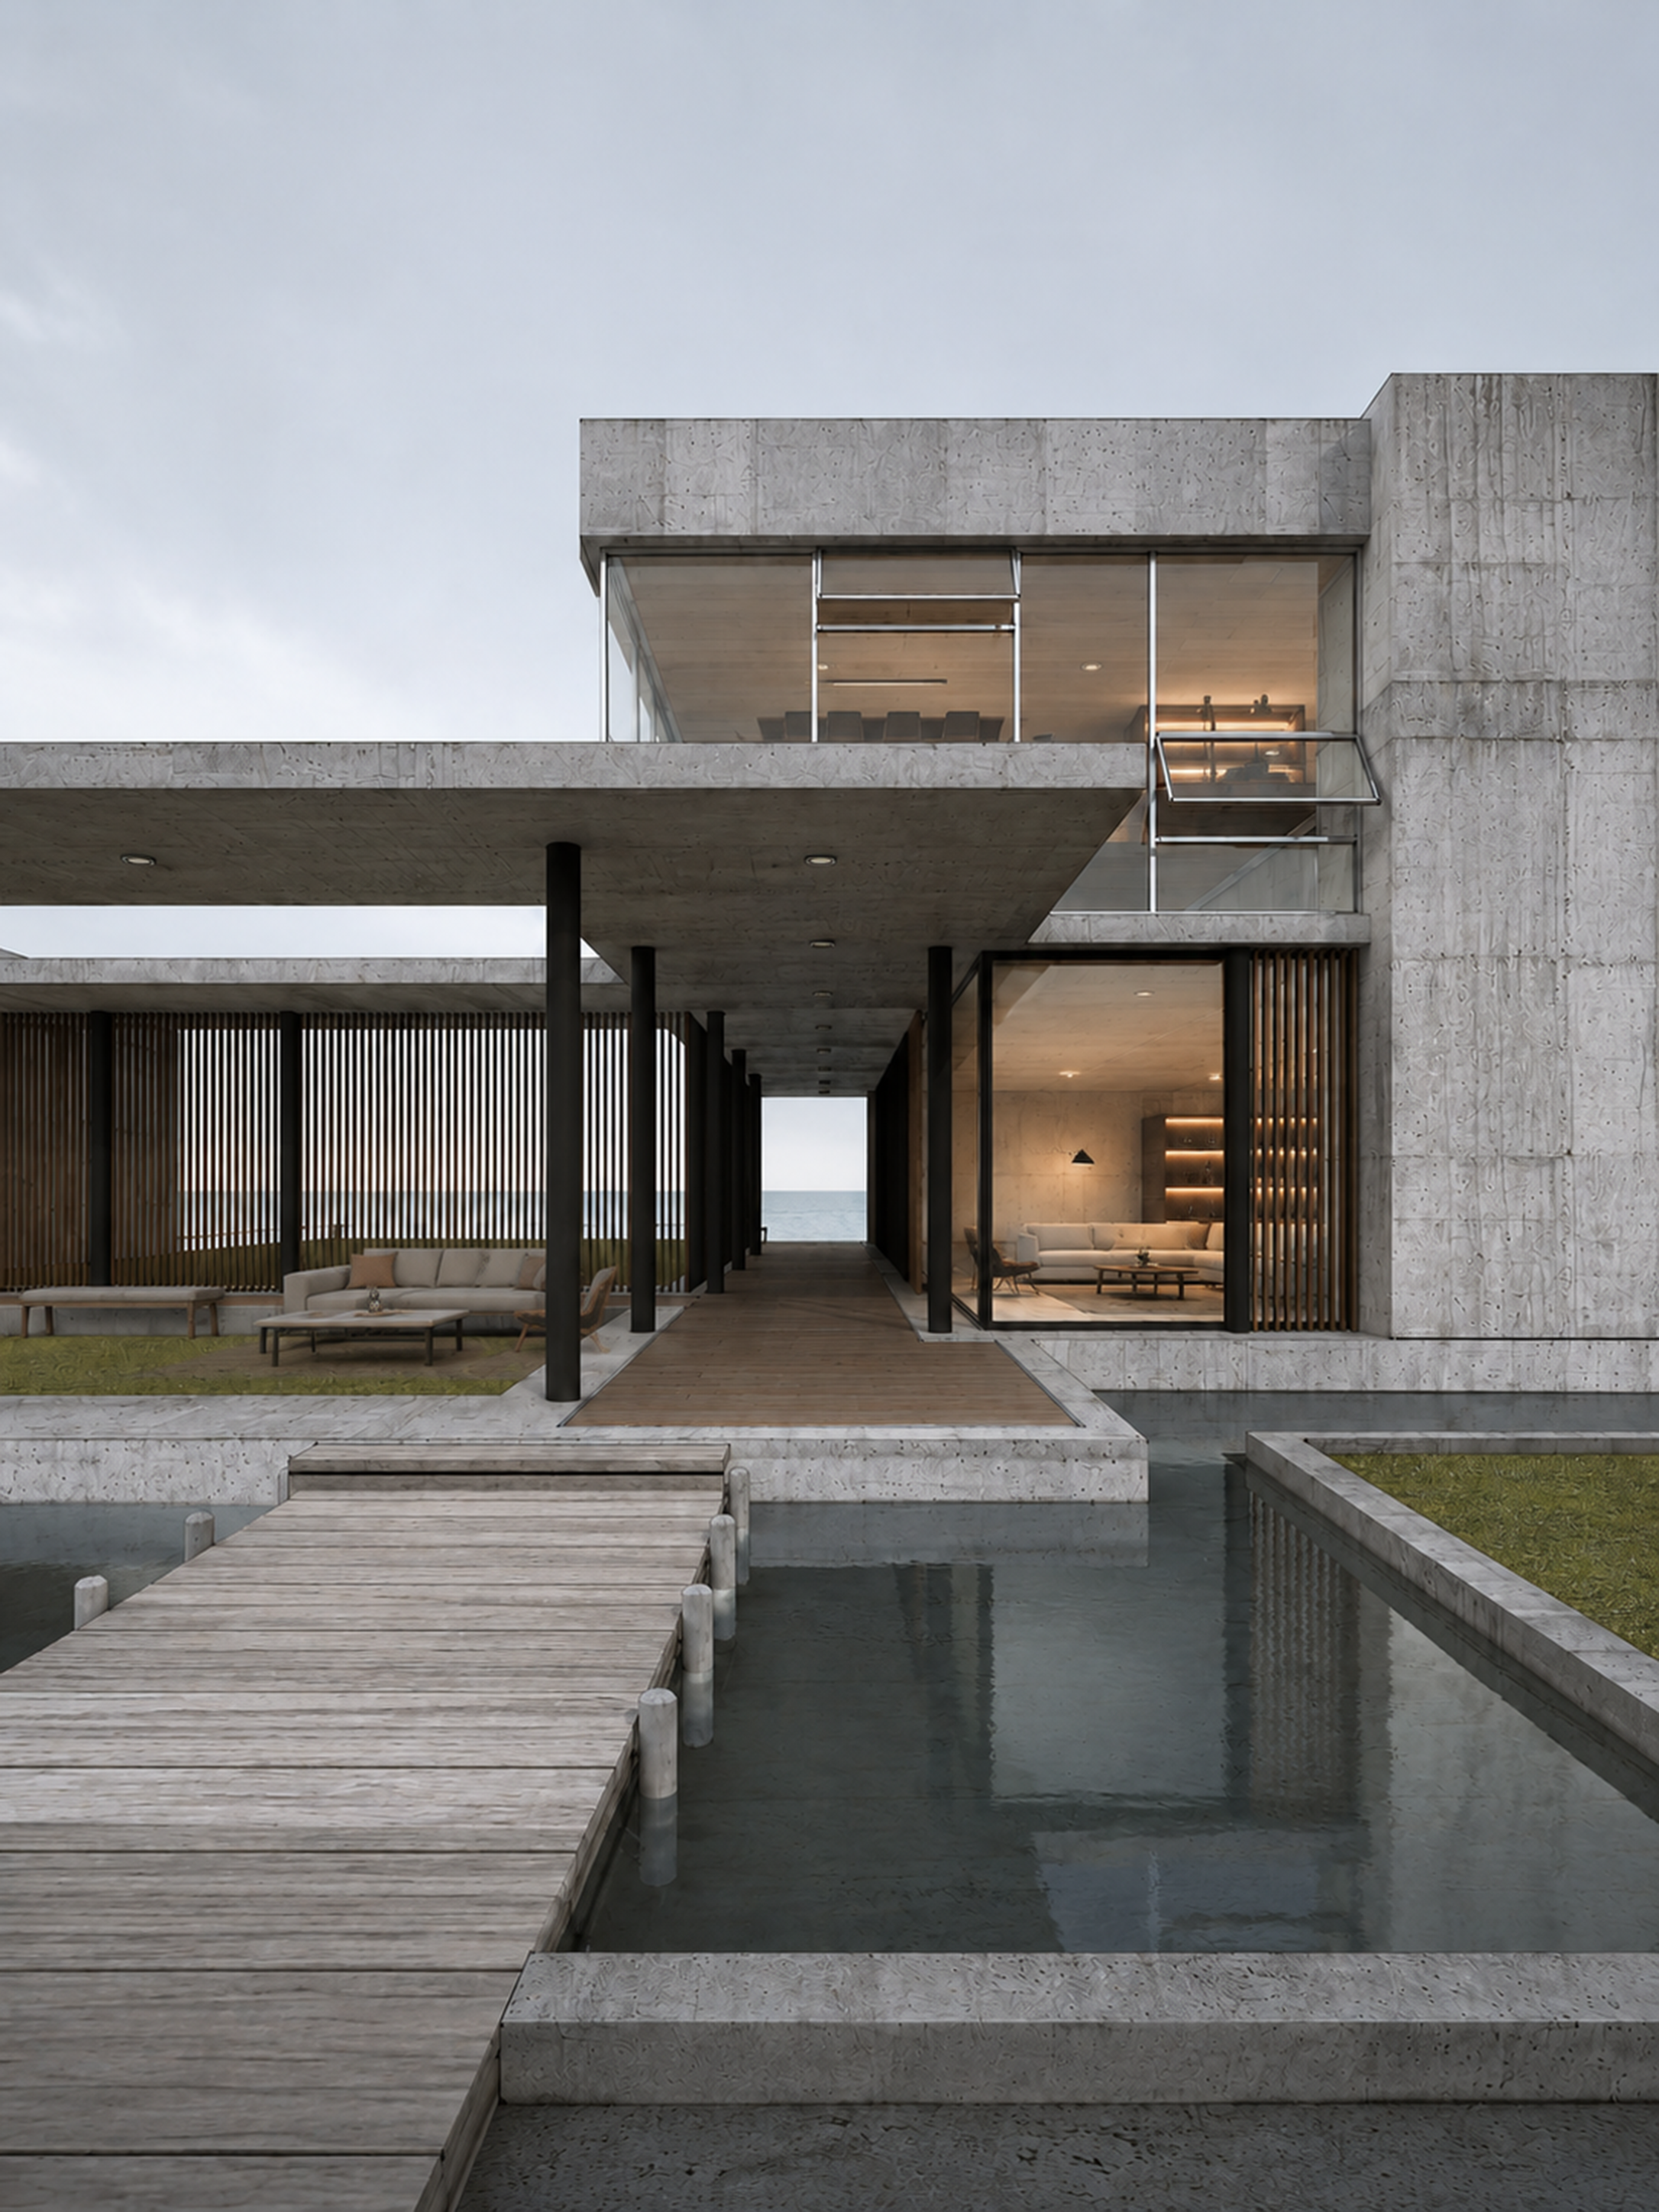
3D 모델의 형태는 유지하면서 콘크리트, 유리, 금속, 목재, 물의 기본 실사 질감을 먼저 만듭니다.
Use the reference image as the exact base. Transform this SketchUp architectural model capture into a photorealistic architectural visualization.

Keep the exact camera angle, perspective, composition, building massing, roof lines, window positions, columns, deck, water, and overall scale unchanged.

Apply realistic PBR materials: board-formed light concrete with subtle stains and pores, clear glass with soft reflections, black metal frames and columns, vertical timber louvers, weathered wood deck, calm reflective water.

Soft overcast daylight, natural shadows, modern coastal residence, quiet editorial architecture photography, high detail, 4:5 vertical.

Negative: do not redesign the building, do not add extra floors, do not change the number of columns, do not warp windows, no people, no text, no logos, no cartoon style.
이 단계에서는 아직 실내, 사람, 조경을 욕심내지 않습니다. “재질 실사화”만 목표로 잡습니다.
건축 형태가 변하면 이미지 변화 강도를 낮추고 “keep geometry unchanged”를 더 강하게 반복하세요.
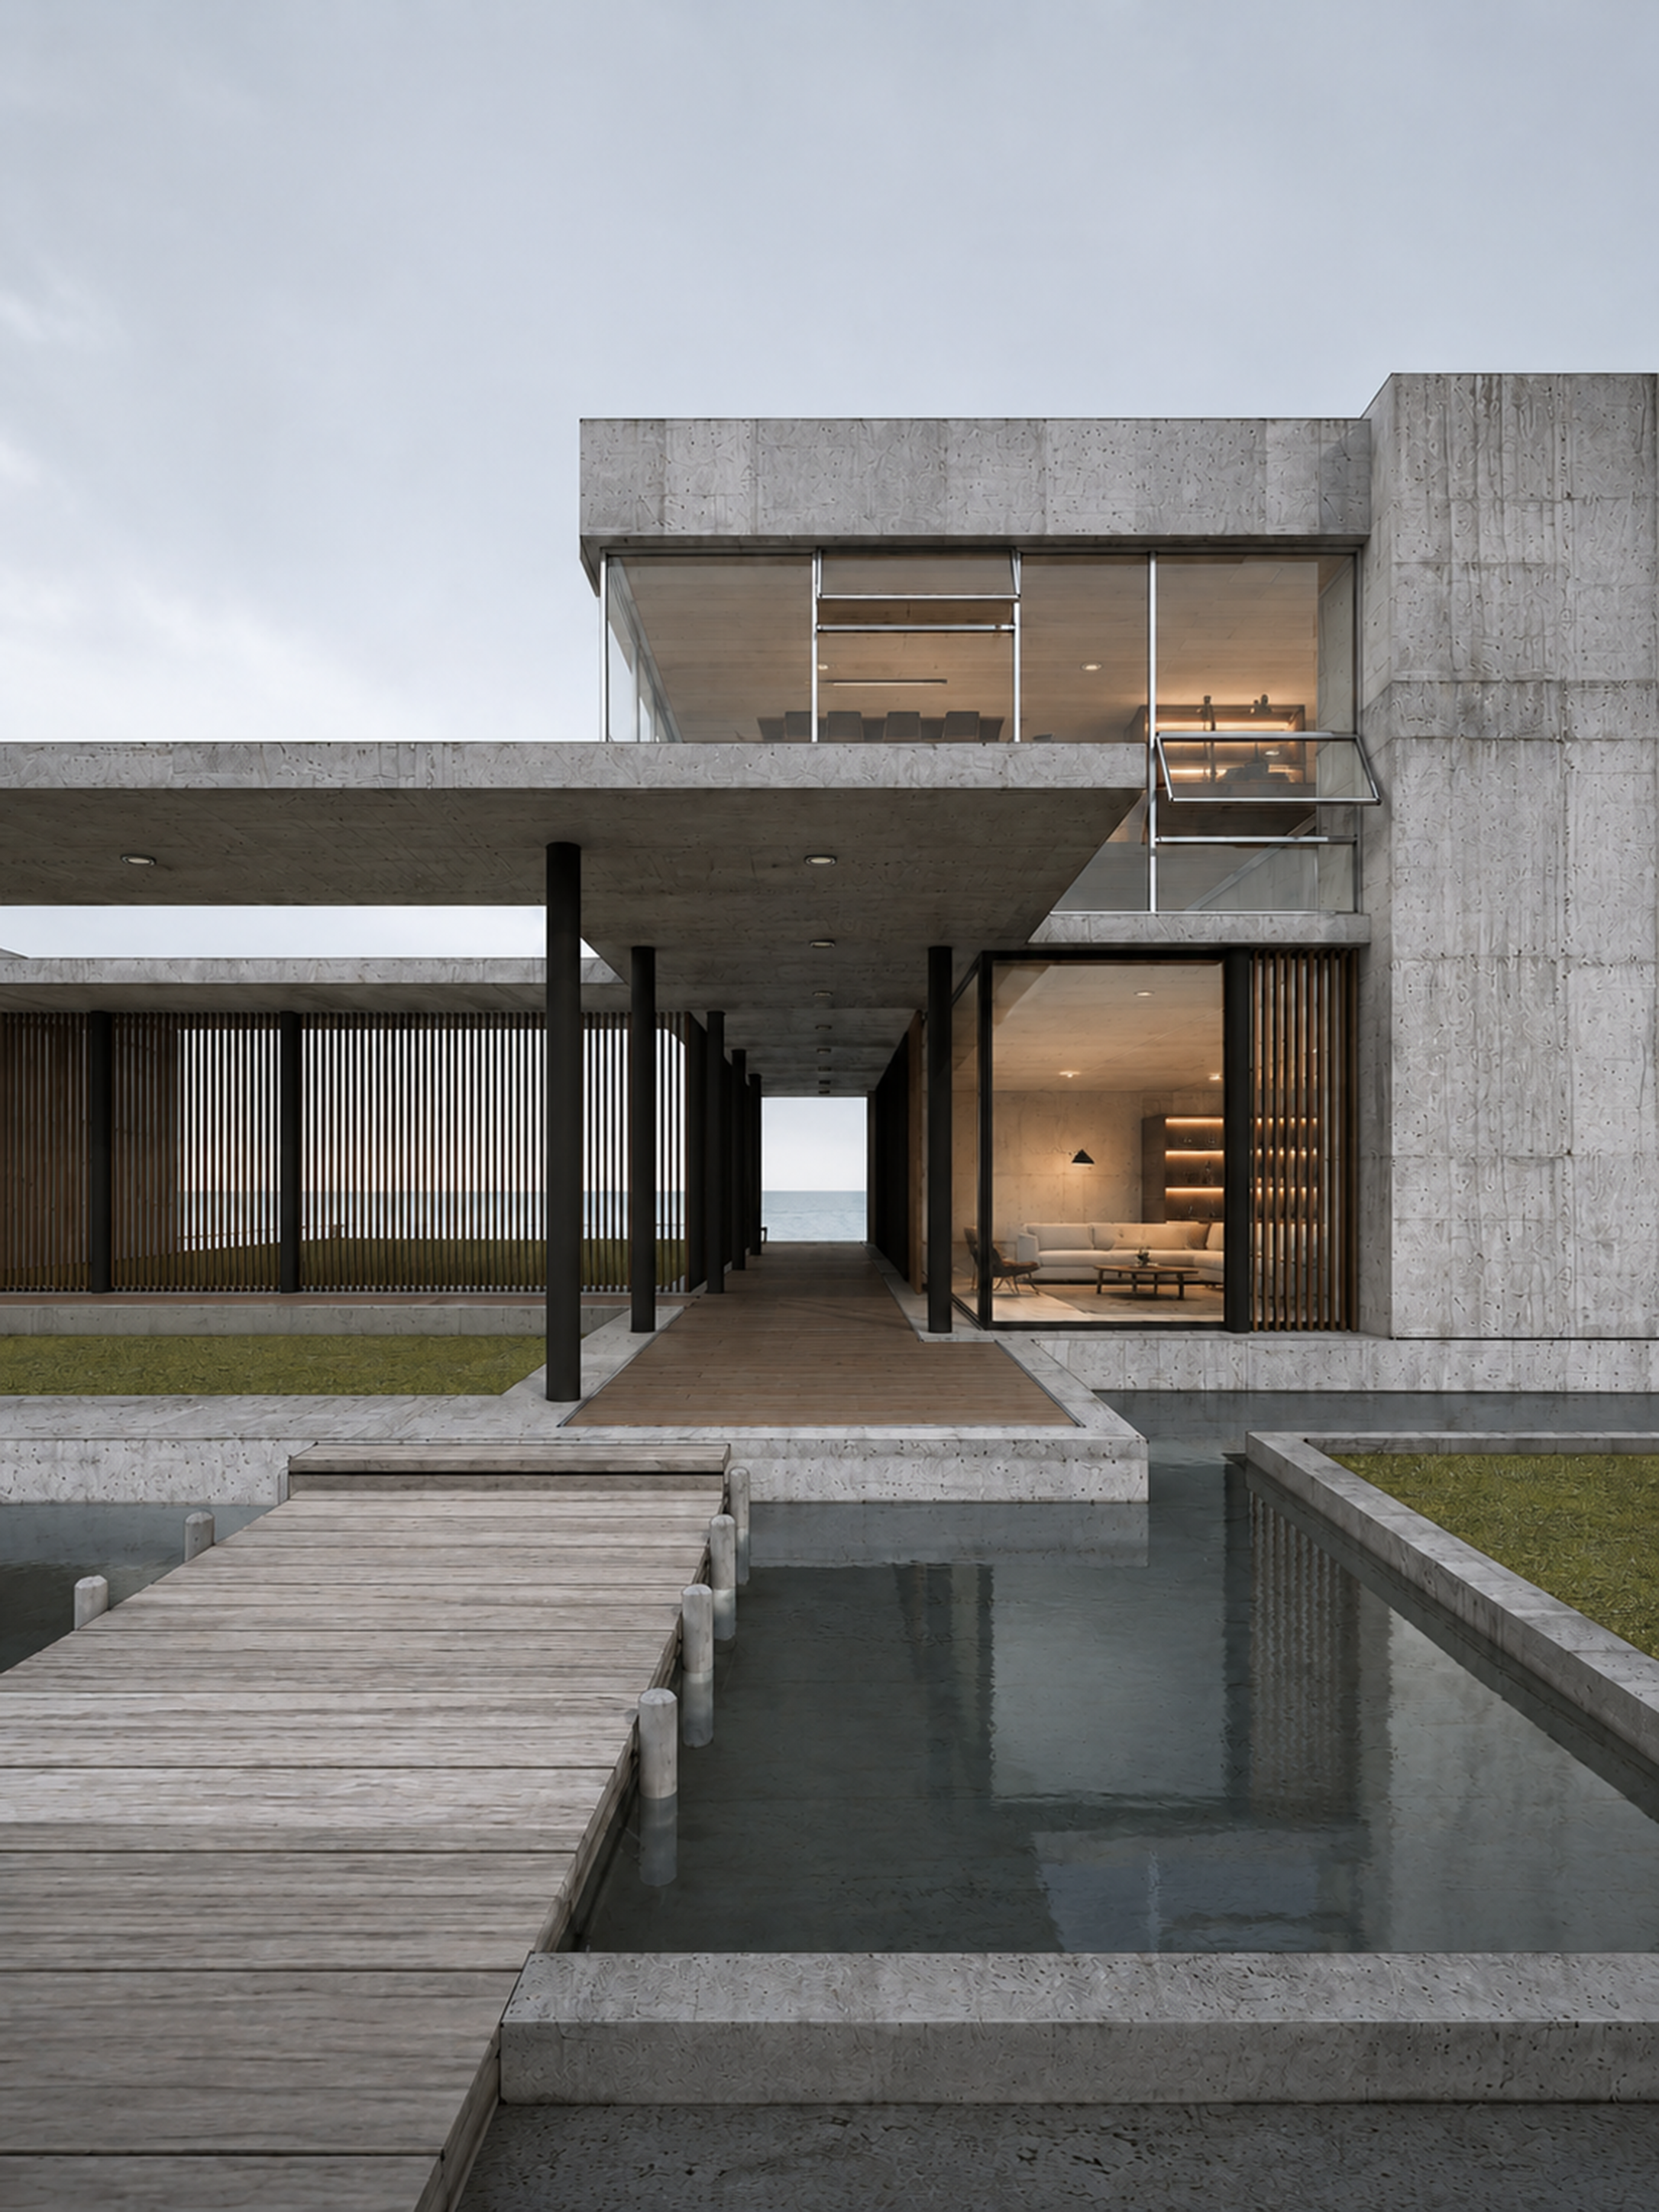
Step 02
유리창 너머로 보이는 공간에만 따뜻한 인테리어와 조명을 추가합니다. 외부 건축선은 그대로 유지합니다.
Use the previous image as the reference. Keep the exterior architecture, camera, perspective, concrete facade, columns, deck, water, and window geometry unchanged.

Add a warm minimalist interior visible only through the glass areas. Include a refined living room with a low sofa, lounge chair, coffee table, built-in shelves, soft indirect lighting, recessed ceiling lights, and warm wood ceiling tones.

The interior should feel realistic behind glass, with correct scale, subtle reflections, and natural depth. Maintain the calm modern coastal residence mood.

Photorealistic architectural visualization, high-end residential interior, warm evening interior glow balanced with soft exterior daylight.

Negative: do not alter the building shape, do not remove glass mullions, do not place furniture outside, no clutter, no oversized objects, no text, no logos.
가능하면 창 안쪽만 마스킹하세요. 전체 이미지에 적용하면 외관 디테일이 흔들릴 수 있습니다.
가구가 커 보이면 “correct real-world scale behind glass”를 추가해 다시 생성합니다.
Step 03
외부 데크와 그늘진 테라스에 생활감을 더합니다. 가구는 바닥면과 원근에 맞게 놓는 것이 중요합니다.
Use the previous image as the reference. Preserve the exact architecture, camera, perspective, window layout, columns, deck, water, interior lighting, and material quality.

Add tasteful outdoor lounge furniture only on the left covered patio area: a low outdoor sofa with neutral cushions, a slim coffee table, one lounge chair, and a simple wooden bench. Align all furniture to the existing floor plane and perspective.

Furniture should sit naturally behind the vertical timber louvers where appropriate, with realistic shadows and scale. Keep the composition quiet, minimal, and high-end.

Photorealistic architectural visualization, natural material textures, restrained outdoor styling, editorial residential architecture.

Negative: do not cover the main walkway, do not change the building, do not add bright colors, no oversized furniture, no extra people, no text, no logos.
가구는 주인공이 아니라 스케일을 잡아주는 요소입니다. 빈 공간을 조금 남기는 편이 더 고급스럽습니다.
가구가 떠 보이면 “realistic contact shadows on the patio floor”를 추가하세요.
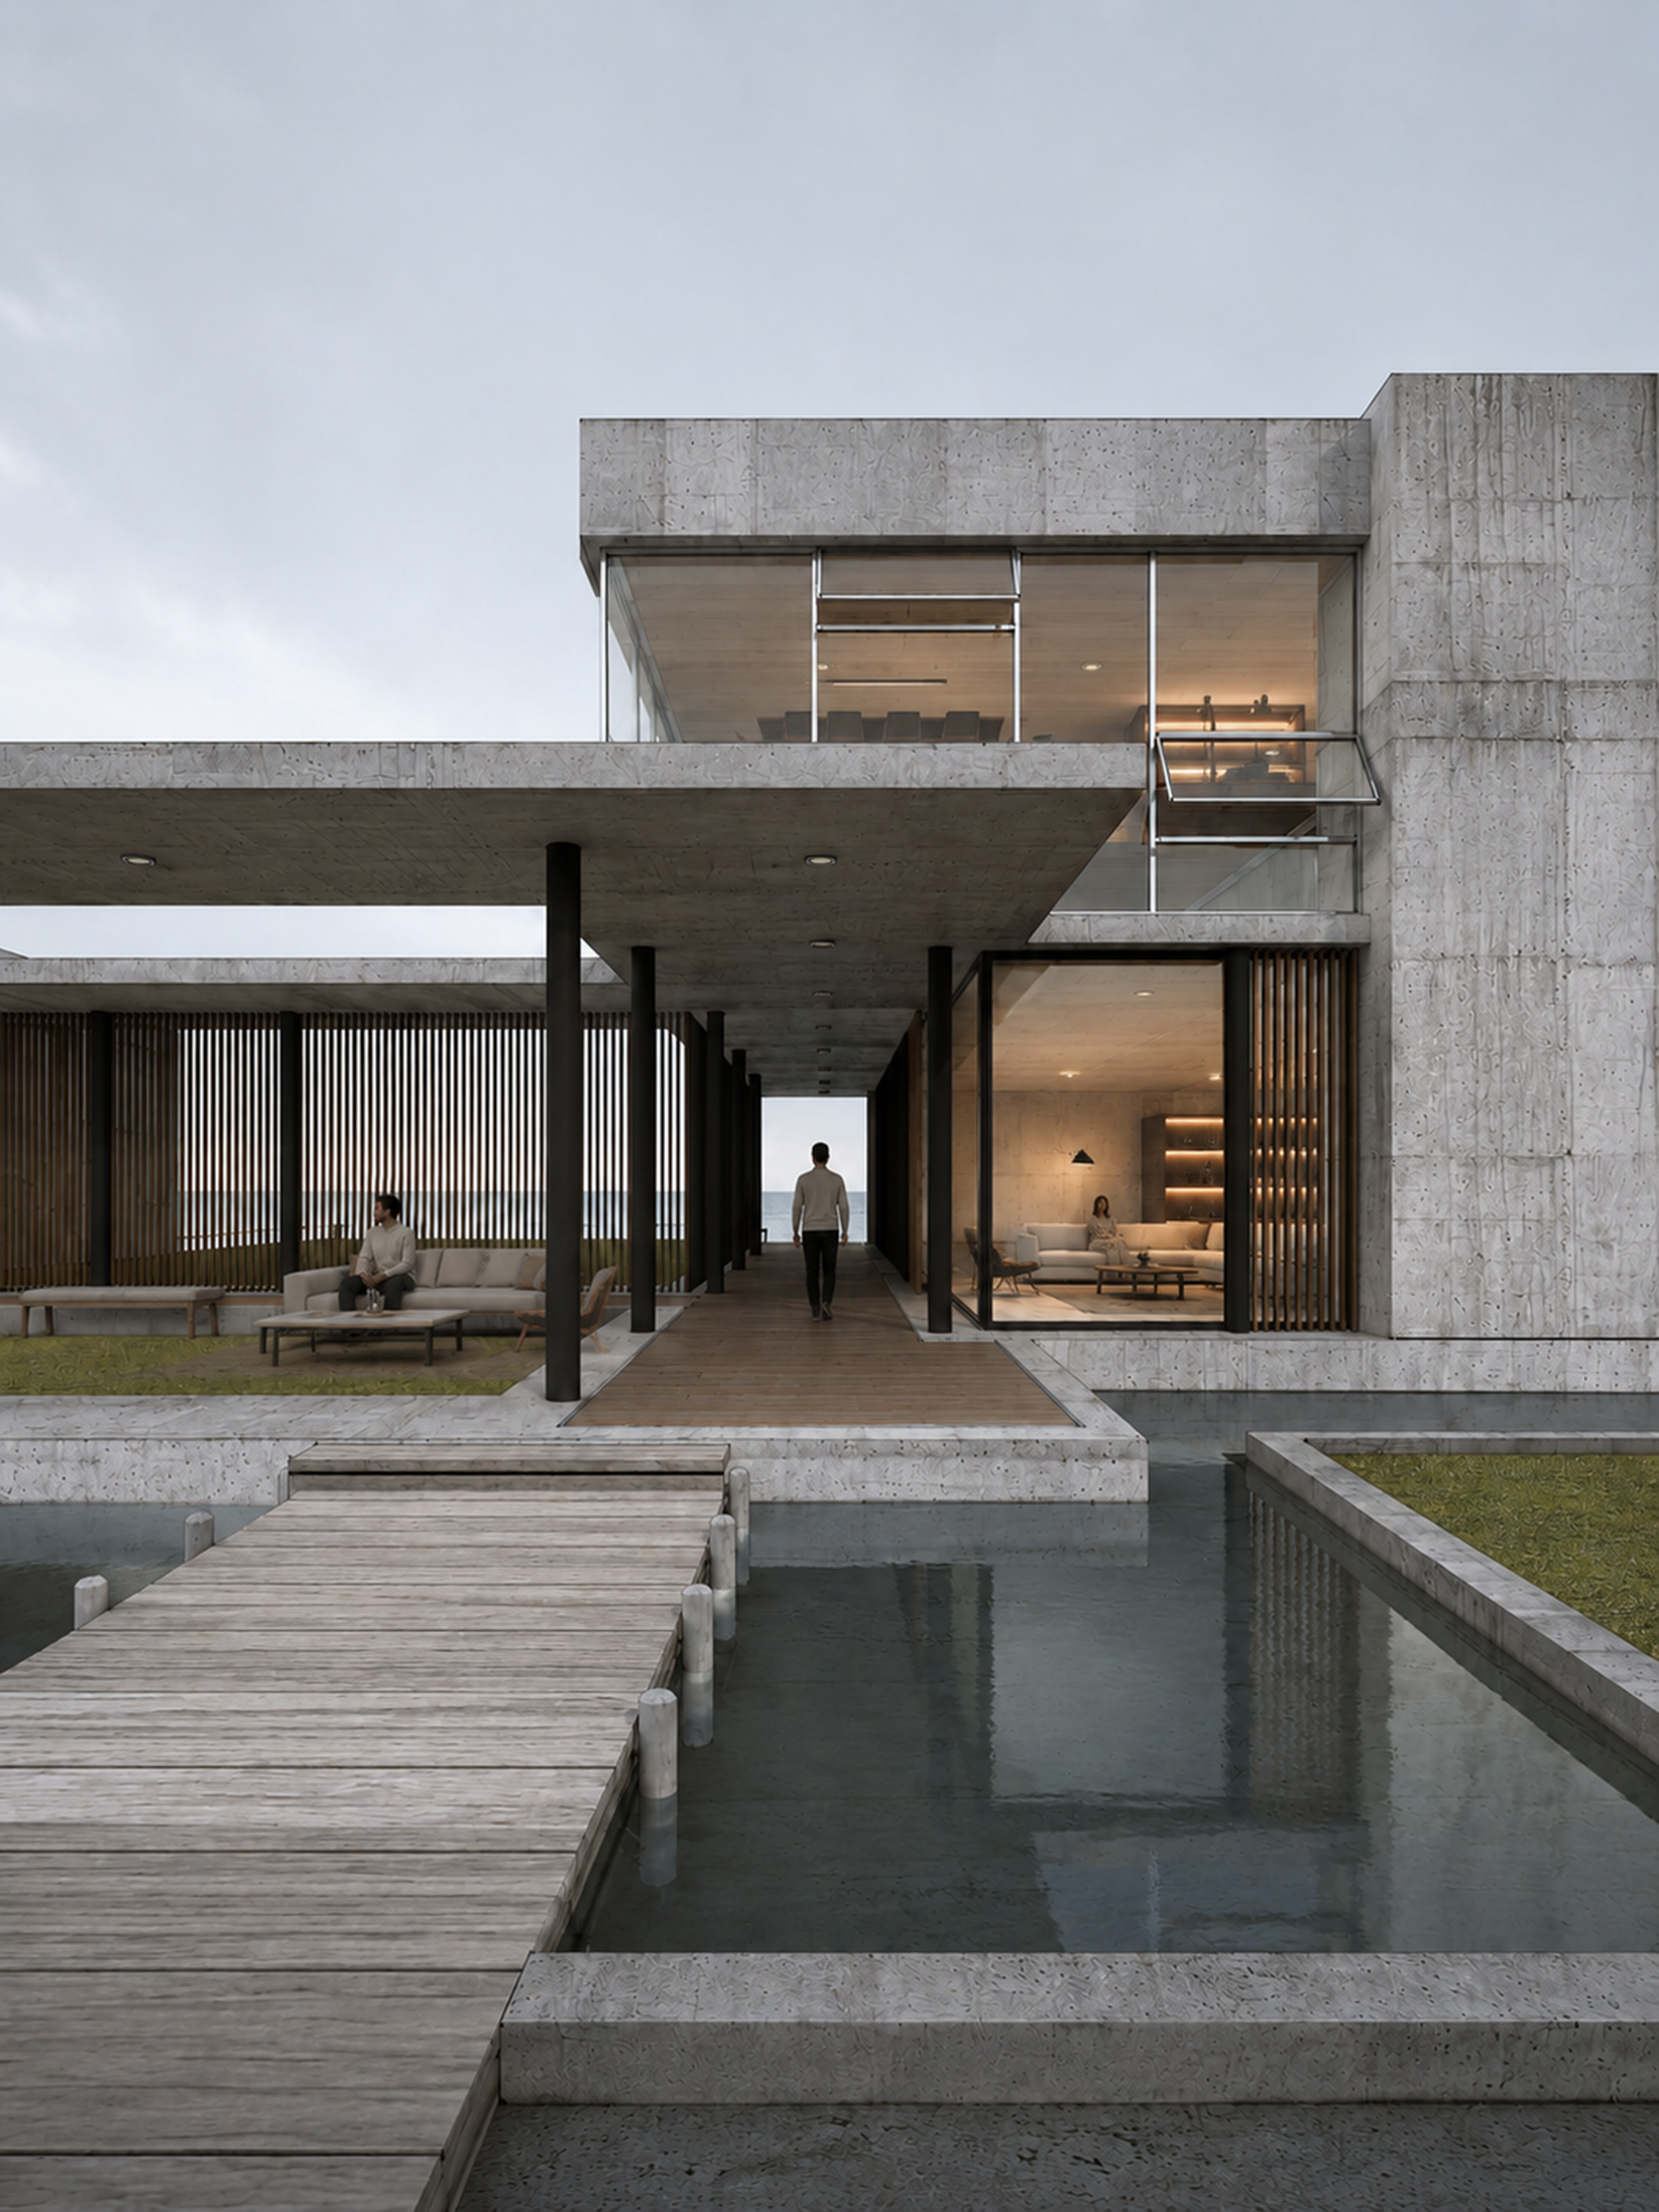
Step 04
사람은 건축의 스케일과 사용 장면을 보여주는 정도로만 넣습니다. 얼굴이나 패션이 시선을 빼앗지 않게 합니다.
Use the previous image as the reference. Keep the architecture, furniture, interior, materials, camera angle, perspective, water, deck, and lighting unchanged.

Add a few realistic human figures as subtle scale references: one person sitting on the outdoor sofa on the left patio, one person walking away along the central wooden deck toward the ocean, and one person seated inside the living room.

Use natural relaxed poses, muted neutral clothing, correct human scale, realistic contact shadows, and believable placement in perspective. People should support the architecture, not become the main subject.

Photorealistic architectural lifestyle visualization, calm residential atmosphere, natural proportions.

Negative: no distorted bodies, no extra limbs, no close-up faces, no fashion-shoot poses, no crowd, do not change furniture or building, no text, no logos.
사람은 동선의 깊이를 보여주는 위치에 배치하면 좋습니다. 중앙 데크의 뒷모습은 원근감을 강화합니다.
인체가 어색하면 사람 부분만 다시 마스킹해서 수정하는 편이 전체 품질을 지키기 좋습니다.
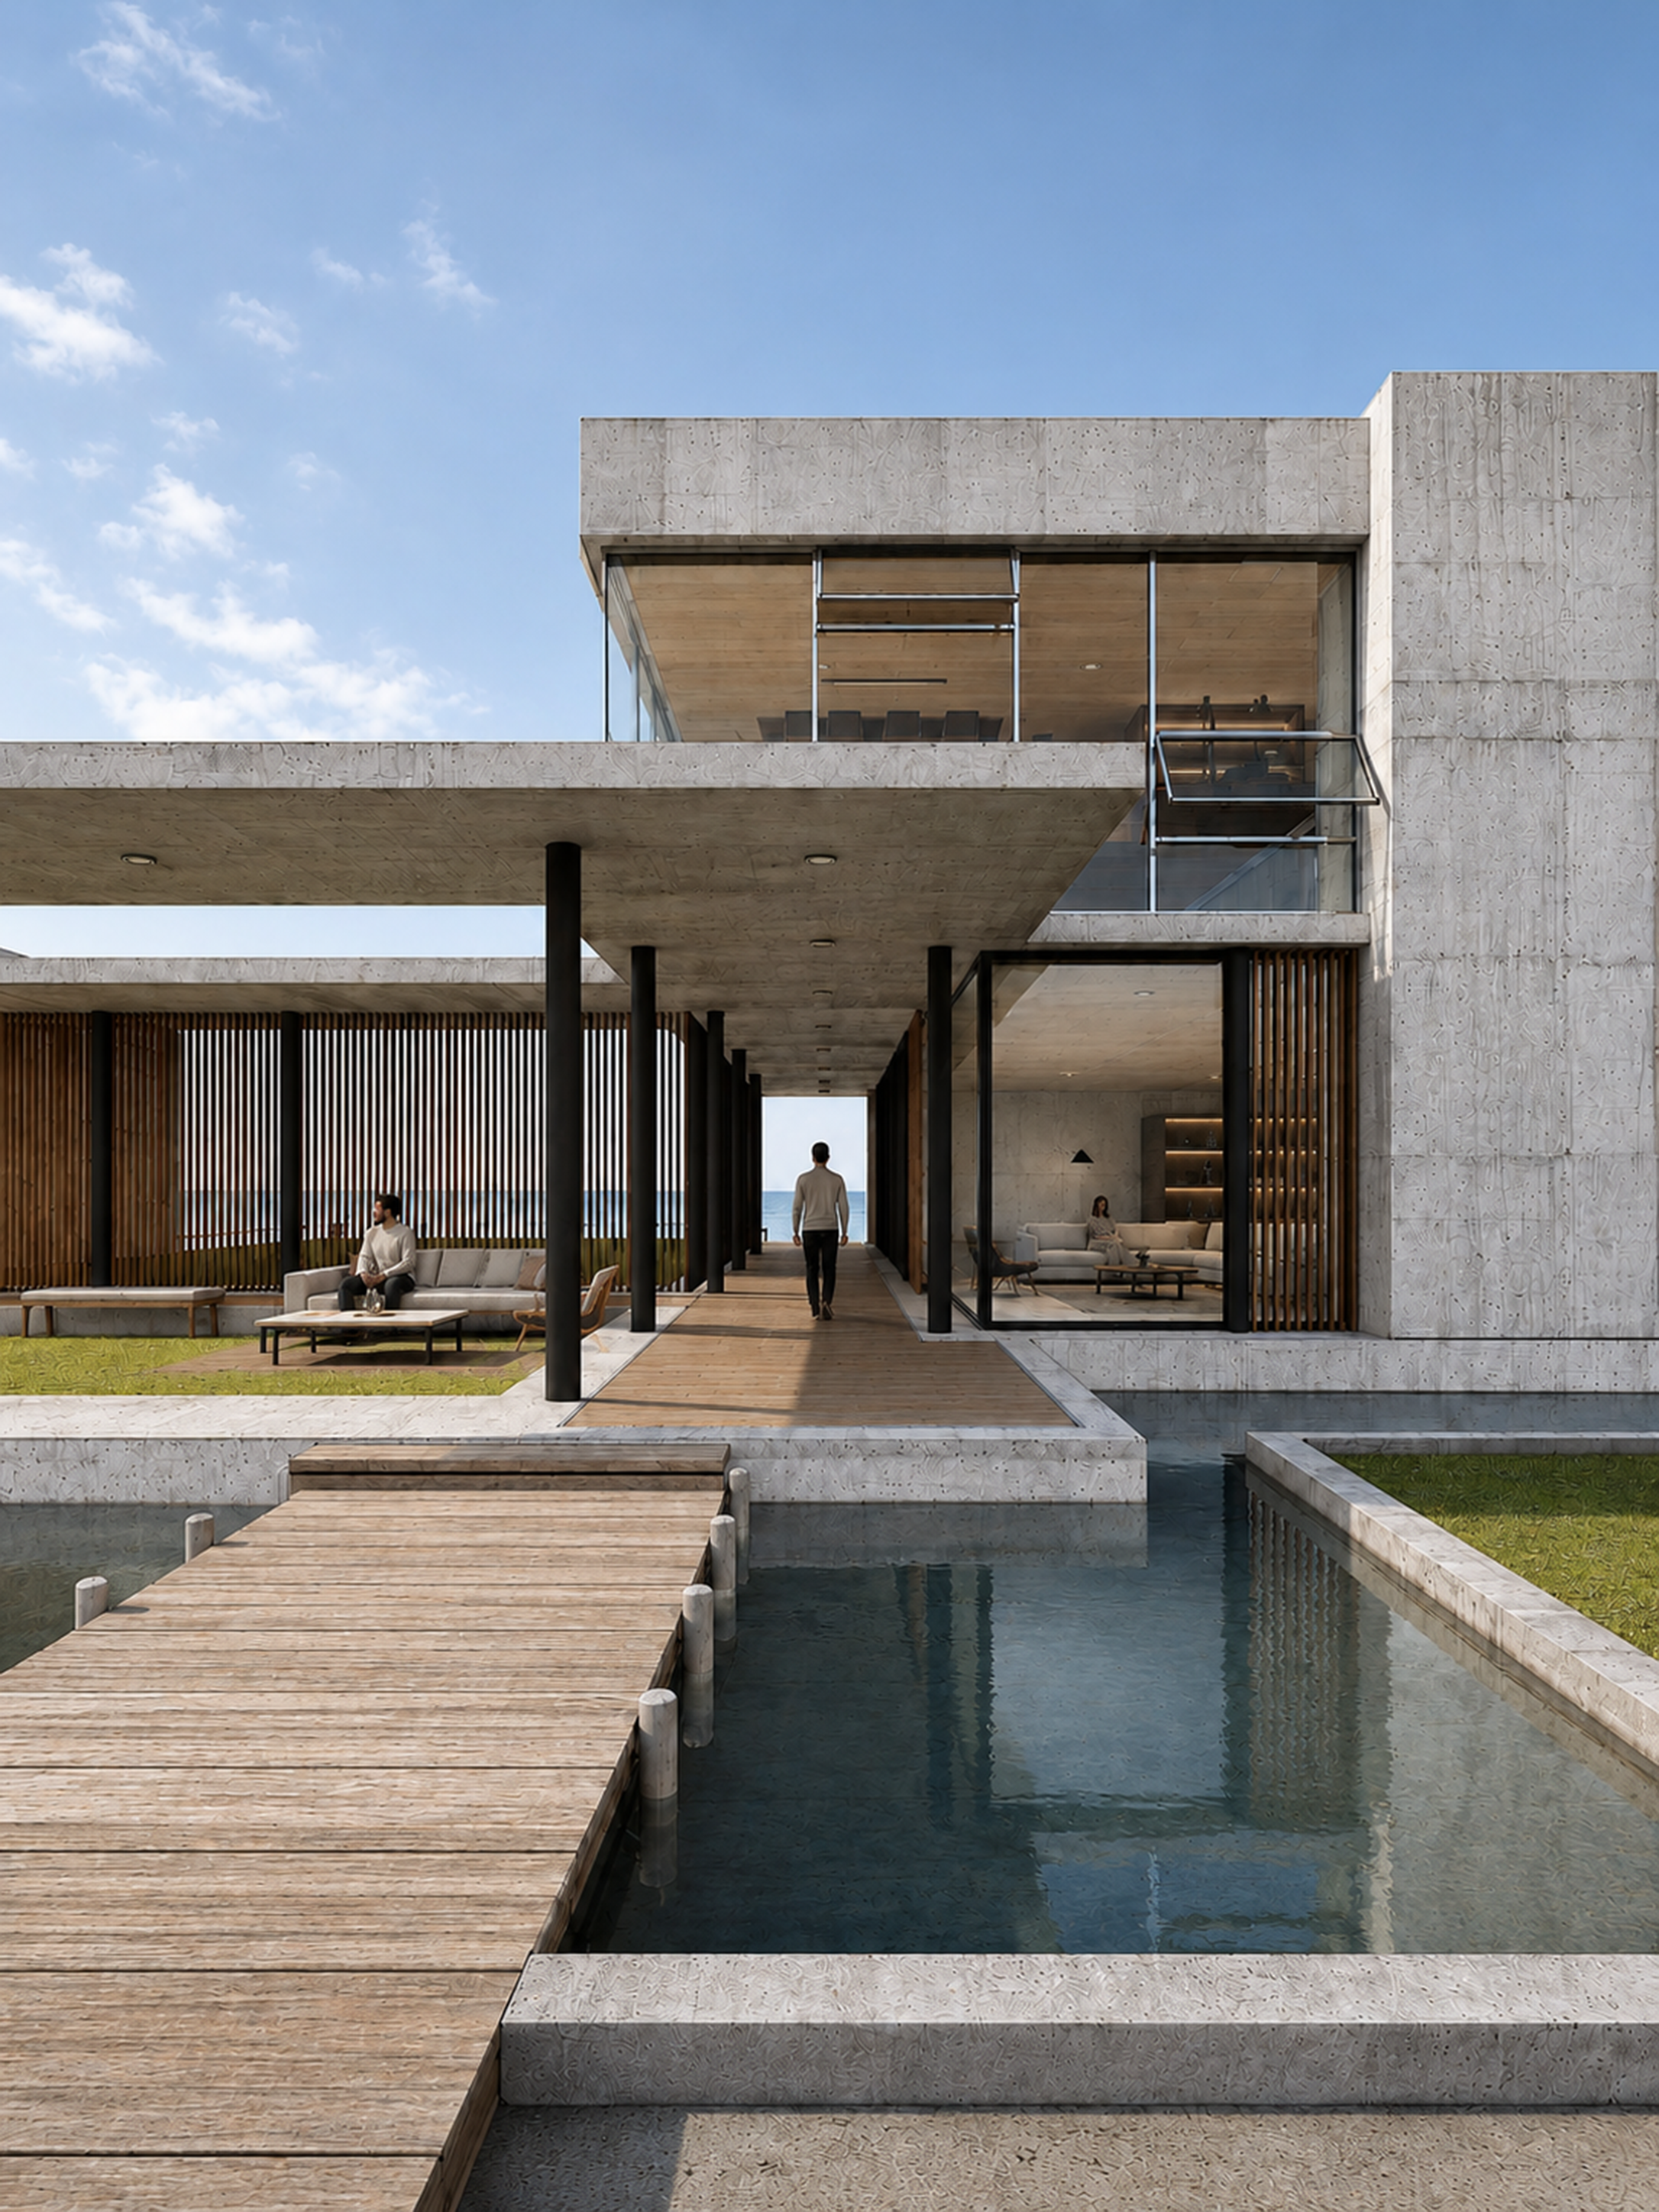
Step 05
흐린 기본 렌더를 맑은 낮의 건축 사진처럼 정리합니다. 빛, 그림자, 반사, 콘크리트 디테일을 한 번에 다듬습니다.
Use the previous image as the reference. Preserve all architecture, furniture, people, interior, camera angle, perspective, and composition exactly.

Adjust the scene to a bright clear daytime atmosphere with a blue sky and soft white clouds. Add natural sunlight from the upper left, crisp but realistic shadows, brighter concrete highlights, richer timber tones, clearer glass reflections, and more realistic water reflections.

Refine material quality without changing the design: detailed light concrete texture, natural wood grain, black metal, transparent glass, calm water, balanced color grading, clean architectural photography contrast.

High-end photorealistic architectural visualization, sunny coastal residence, natural daylight, realistic exposure, 4:5 vertical.

Negative: do not move people, do not add landscape yet, do not redesign the facade, no harsh HDR, no orange sunset, no excessive saturation, no text, no logos.
하늘을 바꾸면 전체 색온도가 같이 흔들릴 수 있습니다. 콘크리트가 너무 노랗게 변하지 않게 확인하세요.
수면 반사는 “physically plausible water reflections”를 넣으면 과한 거울 효과를 줄이기 좋습니다.
Step 06
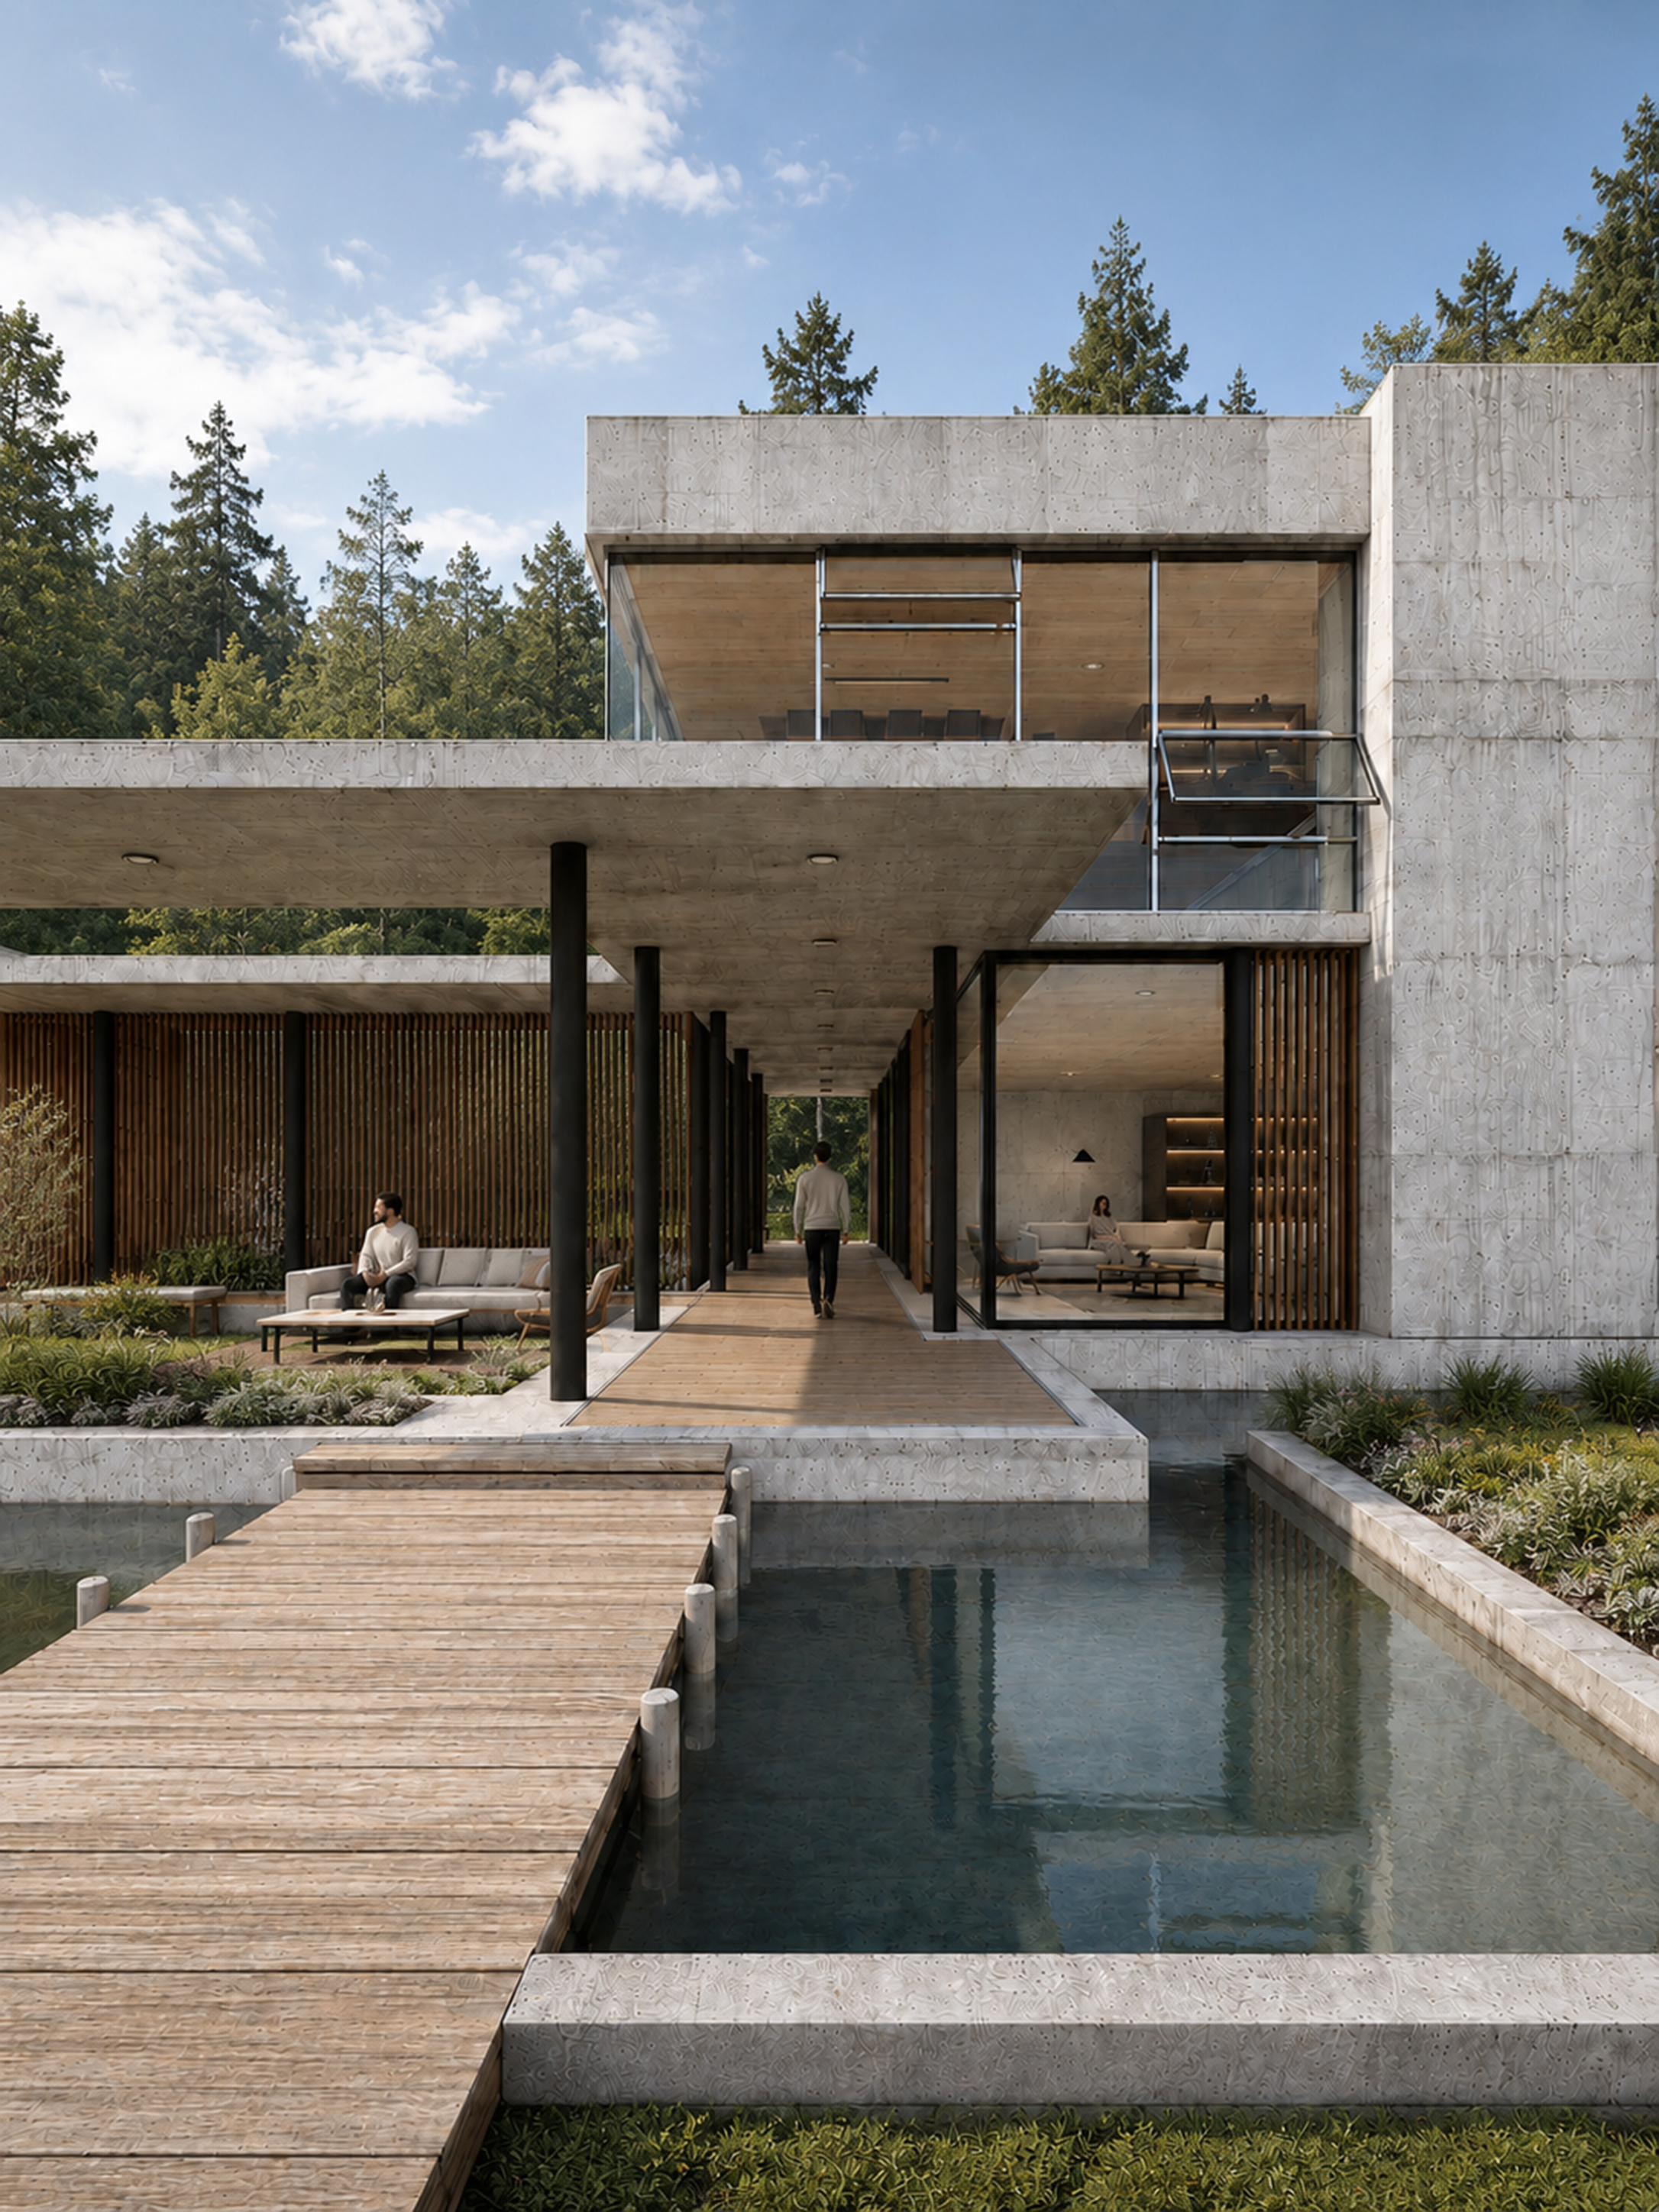
마지막으로 주변 맥락을 넣어 완성도를 높입니다. 식재는 건축을 가리지 않고 프레임의 깊이를 만드는 역할입니다.
Use the previous image as the reference. Keep the architecture, people, furniture, interior, weather, sunlight, camera angle, perspective, water, and material quality unchanged.

Add realistic landscape design around the building and water edges: layered low shrubs, ornamental grasses, small flowering plants, natural ground cover, and dense evergreen trees in the background behind the building.

Vegetation should match the sunlight direction, cast soft natural shadows, reflect subtly in the water, and stay at believable scale. Do not hide the main facade, walkway, or architectural lines.

Photorealistic final architectural visualization, refined modern residence in a lush natural setting, crisp daylight, balanced greenery, editorial quality.

Negative: no tropical plants unless intended, no plants growing through the building, no blocked windows, no changed facade, no extra people, no fantasy forest, no text, no logos.
전경 낮은 식재, 중경 관목, 후경 수목을 나누면 이미지가 단단해집니다.
완성 전에는 창호선, 기둥 개수, 수평선, 인물 손발, 수면 반사가 깨지지 않았는지 확인합니다.